First track with Cubase VST


Go ahead and look around for yourself for a while. OK ? Right, now let's be serious. Before recording any music, we need to select what type of track we want to record on, i.e. audio or midi. To do this, we'll use the column named "C". By clicking on the little drawing, a menu pops up, offering several options. For now we're gonna have a midi one so let's select « Midi track ». Then in the column named "Chn" we need to select the midi channel with which we'll work. Basically, there are two typical cases : either we use a soundcard with midi capabilities, or we use an external module such as a synth. This choice is made in the column labelled "Output".
Let's say we use a soundcard. You should, when clicking on the "Output" column, see an option labelled something like "mysoundcard'sbrandname Midi (620)". Then in the "Chn" column we'll select the Midi channel. Your synths and cards can receive and send on 16 different channels. A metaphor often used for Midi is TV. So you have 16 channels. Suppose we select channel 10 (typically used for drums) on our track. From now on this track will send on channel 10 whatever information it contains. And your synth or card will play whatever sound it contains which is set to play Midi data transmitted on channel 10. By clicking on the "Track" column, you can rename the track.
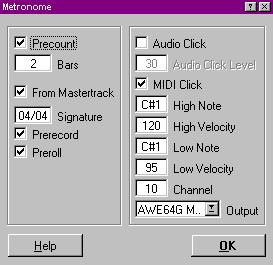
We'll set up a little metronome so that we can play in rhythm. Select "Metronome" in the "Options" menu. There, we have some choice. Let's see ! Precount and Bars : these two fields work together. When activated, Precount will make Cubase playing as many bars as set in the "Bars" field, before recording actually starts. That should allow us to catch the tempo while we run to our synth's keyboard ;-) From Mastertrack : well, let's leave this one as is for the moment. Prerecord : when checked, will make Cubase record while the precount countdown is running, unless we decided to record at bar 1.01.000. Preroll : this one is interesting because when you start recording at, say, bar 10, while your song starts at bar 1, Cubase will play bars of the already recorded tracks during the precount countdown.

Audio Click : : gives an audio metronome rather than a MIDI Click. Your metronome will play on whatever instrument you select. Just like on a Midi track, you need to select on which output (card or external module) and Midi channel the metronome is played. Cubase is originally set up so that a rim-shot drum sound marks tempo. But you can change for something else. For this you need to modify High et Low Note. High and Low Note. The high one is played on first beat of the bar, and low, on the other beats. The fields named Velocity allow to select with what "strength" are first beat and other beats marked. You should chose a significant gap between the two values.
In order to keep the same setup for all your next productions, save your song. "File" menu, "Save as..." option, go to your Cubase folder and save as "def.all" (PC) or "Autoload" (Mac) ; each time Cubase is launched, or for each new song, you'll get back whatever setup you just made above. Isn't it wonderful, eh ?
Hey, when the hell do we record ? Okay, okay, here we go.
The transport bar

But we still need to tweak a few thing ! (Rats, they're gonna kill me !) Well, I sense some irritation here, so let's make it simple, and just setup your transport bar as shown above. The Left Locator determines at which song position will recording start. The Right, one we'll address later on. Tempo/sig(nature), ), easy, this one sets tempo and signature ! Click Click lit, the metronome is active. Switched off, it is... it is... Well, only two of you are following ! Well, well, well, all right, now we're all set ! Go ! Click on the red button, or hit the *" key on your numeric keypad. You hear your metronome. Wait for as many bars as you set for Precount and... Watch out, you're on air ! As an example, play a snare drum on 2nd and 4th beats. When your fingers start hurting click on the yellow button or on "0" on your numeric keypad. Then hit again "0" to bring back the song position to where you started recording (Left Locator). Click on the green button or on "enter" on your numeric keypad. You hear what you just played. Crazy, eh ? What about a kick drum now ? Easy, start again recording in the same way as above and play the kick drum while you listen to the snare. Even better, record the kick on another Midi part. There's room for plenty of them. After you hit "0" you find out that your last take is just crap ? No problem, just select "Undo record" in the "Edit"» menu. Off goes the nasty glitch !
Now that you caught the basics, record the bass, the piano, and anything that comes across your mind. Your DX7 is on Midi channel 7 ? Set a track to this channel and select it to record upon it. The next time, we'll see how to have instruments automatically switch to the desired patch. Plus some other nice things. I know, I shouldn't be that nice, but I don't care ! Meanwhile, stay tuned !


