First Audio Track

It's almost the same story, but in fact it's a different matter.
But so easy ! Er, well...
Before we start, make sure that your system is OK. If you have any doubt about it, get a little wave file (500 KB max.) and double click straight between its eyes: The Windows media player, or your wave files' default player should play the file. If you hear something coming out of your audio equipment, you won: you graduated to the next level! Now, the worst case: You don't even know if there are wave files on your HD. Don't panic: run Start/search/files or folders. folders then type *.wav in the Named field. This program scans your HD and reports all wave files on it. Make a choice among the reported files. I know, for most of you, this is basic and well-known procedure, but maybe someone is a DAW perfect beginner? and has just swapped his or her 4-track tape recorder for a brand new PC with Cubase. It happened to me a few years ago. Don't loose heart !
First we will make our life easier: disable Cubase monitoring. To do this, go to menu item Audio, System. Dans le cadre Monitoring, then select Global disable in Monitoring section.

If you successfully went through My first Midi track with Cubase, you should be able to record your first audio take without any problems. Audio recording works in a similar way as MIDI recording does, you choose a track, you name it, you specify record start point, you specify Stereo/mono and go,go,go you record. I went too fast? Right: Some pictures to illustrate all this.
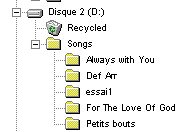
A little piece of advice: Keep all your audio files in a specific folder or even better in a specific partition of your HD. Or best-of-all solution, dedicate a whole HD exclusively to Cubase and Audio files ! You will avoid such scenes as : "Where the hell is this *#!!ù% file ? Here... No, then here... No... There?? §#/!!## !". So try to be (a little) organized.

As with your first MIDI take, you should specify track type, Audio Track, and audio channel. The output is always VST.

Then you should name your audio file. Yes, your masterpieces will be made up of several files. A Song file (.all) that contains all midi related stuff and audio files that contains all digital audio data. There is only one song file per Cubase song but there could be dozens of audio files per Cubase song. These audio files could be sourced from Cubase recording, external audio recording software, CD-rom, Internet etc. They could also be used in several Cubase song. That's why going thru File/Audio Files Folder selection is a good thing. You should choose a folder in the standard Windows dialog box which pops up. Your audio files will be stored in this folder. Check out above how to organize them.
Then you should choose a nickname for your audio file. Type Vocal for instance in the Record Info. The entire name of your file will be vocal.wav. Right below select Mono or Stereo. Take care, stereo tracks use two VST channels. Then click on the pretty-looking FX/EQ button.

A mixing board channel appears in front of your astounded eyes! It`'s the mixer channel strip for your audio track.

Click on the li'le In button to light it up. The level meter now shows the recording level. When the In button is turned on, the meter shows the level of what comes in. When 'In' is switched off, the meter shows the level of... what comes out (monitor level). You won! Congratulations! Now plug a mic to your audio card input through a mixing board. And say Hello? to the mic. Don't stop. Go on until it answers you!! You should take advantage of his silence to set input peak level close to -2/-1. Move the fader of your external mixer and the virtual fader of Windows recording mixer to set this level. If the input level is too high, the red LED lights up, showing clipping (max level exceeded). Click on the red LED to reset the display. When this setting is done, you can go recording. Be careful, a digital recording MUST NEVER CLIP !!!. Unlike tape recorders which produce a warm tone if input level is over 0dB, digital converters hate that.
"Great: but it doesn't work! the level meter seems dead!» No problem, go directly to Audio/Input menu item. The green button should be lit. Otherwise simply click on it. This action switches between enabling and disabling audio input.

You can rename Audio track in the same way as with midi tracks. Then set the left locator at 0005.01.000. . Then set the left locator at 0005.01.000. Why? If you set the left locator at 00001.01.000 you will experiment audio/midi synchro issues or the beginning of audio file missing. Activate click and hit the "*" key. After 2 bars count-in, it's up to you! Sing or talk as you want. In order to stop recording, hit twice 0 on your numeric keypad. Cubase draws a Part like this one :
Press enter and listen ! Crazy, isn't it ?
It's done! You have made your first digital recording. Cool, he? Your recording file is simply a 0 and 1 series, which put together form numbers. Can you imagine all the calculations that we can make over these numbers? Well, actually the CPU makes them, not us. And these calculations will produce equalizers, effects, time stretch, pitch shifting, reversing, as you could with good old hardware, and even more. Meanwhile stay tuned !


